Beta features
Getting started
Hardware and operating system requirements
Creating projects
Workspaces and workflows
Frame.io
Capturing and importing
CapturingImporting
Importing from Avid or Final Cut
File formats
Editing
Sequences
Video
Audio
Text-Based Editing
Advanced editing
Best Practices
Video Effects and Transitions
Effects
Transitions
Titles, Graphics, and Captions Titles
Graphics
Captions
Animation and Keyframing
Compositing
Color Correction and Grading
Exporting media
Export settings
Collaborative editing
Long form and Episodic workflows
Working with other Adobe applications
Organizing and Managing Assets
Best Practices
Improving Performance and Troubleshooting
Working with Proxies
Knowledge Base
Extensions and plugins
Monitoring Assets and Offline Media
Monitoring assets
Offline media
Prevent known crash issues
On mac
OS versions before 13 (Ventura), Premiere Pro crashes at startup
The first time Premiere Pro, After Effects, and Media Encoder are launched after installing on older mac
OS operating systems (earlier than mac
OS 13 Ventura), a message stating Display surface initialization failed is presented, and the application then crashes. This failure will not happen again in subsequent launches of each application. Apple resolved this issue in mac
OS 13.
Bạn đang xem: Hướng dẫn sử dụng premiere pro cc
On Windows
We recommend that Windows users download and use NVIDIA drivers (version 531.41 or higher). This will resolve any crashing issues that may have been present with older drivers. For more information, see the NVIDIA documentation.
Export mode fails to load in Premiere Pro 23.2 and 23.3
Export mode fails to load and prevents exporting. A loading spinner is shown, but the Export mode fails to load. Selecting File > Export > Media or using the keyboard shortcut (Cmd + M /Ctrl + M), there is no result; you stay in Edit mode. In these situations, exports won’t work in Premiere Pro. In this state, Quick Export also fails to function. This issue is known to affect Premiere Pro versions 23.2 and 23.3 on mac
OS and Windows.
If you are experiencing this issue, follow the workarounds posted here to get your export completed.
Issue: There is a known issue with the latest NVIDIA game-ready drivers when running Adobe applications on machines with NVIDIA cards, which can cause Apple Pro
Res RAW playback to show black frames.
Workaround:
With Premiere Pro, update to driver version 528.24 or higher. If that isn"t possible, revert to the older version, 528.49.With After Effects or Media Encoder, no NVIDIA driver fix is available yet. It"s recommended to roll back to the older version, 528.49.Issue: An issue affecting H.264 and HEVC or H.265 exports on Windows with Premiere Pro 23.1.
The issue impacts H.264 and HEVC or H.265 exports to folders with names that use double-byte characters, such as Chinese, Japanese, Korean, or extended ASCII characters, like accents and umlauts.
Affected users will see this message: “File importer detected an inconsistency in the file structure of %filename.mp4%. Reading and writing this file’s metadata (XMP) has been disabled.”
Workaround: We"ll let you know when a fix is available. But if you"re experiencing this issue, use one of these options:
Choose an export destination folder that uses only single-byte ASCII English characters (no accents, umlauts, etc.).Export to a different format, such as Apple ProRes.
Issue: The MOGRT gets applied, but the font never syncs because Creative Cloud login items were disabled, and Premiere Pro did not enable Core Sync items at the app launch.
Workaround: Open the Creative Cloud Desktop app, then go back into Premiere Pro and let the font sync.
For more details, see Fix login item issues for Adobe Creative Cloud on mac
OS Ventura.
Result: While on Apple silicon, importing an AAF file with multi-channel audio, represented as multi-mono audio, will stutter during playback.
Expected: The file instance imported via AAF should play as well as the file instance that was directly imported.
Workaround: Use PPro Win or PPro on Mac Intel.
Unable to select Video Rendering and Effects options on Windows devices with Intel GPU and NVIDIA Graphic cards
Issue: You are unable to select from the Use options from the Video Rendering and Effects dropdown because it is greyed out. Or, if you open any project that uses Open
CL or CUDA, you get an error message - "Mercury Playback Engine is not available."
Workaround: When Open
CL™ and Open
CL to the machine, along with one by Microsoft, and NVIDIA is by default chosen as an Open
CL device.
If Open
CL™ and Open
CL™ and Open
The compatibility pack is a backup implementation designed for ARM devices, thus, should not impact other installed applications.
If you try to open an audio/video clip or sequence in Audition (Edit > Edit in Adobe Audition > Sequence), a warning dialog appears asking you to install the latest version of Audition (even if you are using the latest version).
To work around this issue, click OK in the warning dialog and it works correctly. Opening the .prproj in Au via native import (File > Import) also works correctly.
Premiere Pro is unable to publish videos directly to Facebook.
The login to Facebook may fail. Even if the login is successful, the upload will be rejected by Facebook. As a workaround, media should be exported to the local computer and then uploaded via the Facebook website.
Premiere Pro stops playback at around 34:46 (Fixed in v22.3.1)
For some users, playback or rendering may stop around 00:34:46:00 in the timeline. After this happens, audio and video will no longer play back anywhere in the timeline. Exports in Premiere Pro and Adobe Media Encoder also hang at about the same point.
This issue occurs in the following scenarios:
Audio present in the timelineAudio present on two or more tracks
Timeline longer than 34:46
This issue is fixed in Premiere Pro version 22.3.1.
In Premiere Pro or Media Encoder on M1 Pro, M1 Max and M1 Ultra systems, the following errors can result when rendering to Pro
Res 4444 and Pro
Res 4444XQ codec variants with Alpha channel.

The temporary workaround for this issue is to disable Pro
Res Hardware encoding using the Media preferences dialog (Preferences > Media).
Deselect the Enable Pro
Res hardware-accelerated encoding, if available option. It is checked by default.Select OK and retry render.

Plug-in compatibility issues
Premiere Pro 22.1.1 introduced a bug that impacts third party After Effects plug-ins that work in Premiere Pro, such as those from Boris
FX, Red Giant, Digital Anarchy, and other vendors. The bug impacts plug-in functions that request a frame from Premiere Pro, such as a thumbnail image.
For more information on affected plug-ins and workarounds, see this community post.
Out of memory errors on M1 Macs
If Premiere Pro or Adobe Media Encoder is experiencing out-of-memory errors on M1-based Macs, adjusting the amount of memory allocated to Adobe applications may help decrease or eliminate the occurrence of these errors. You can try increasing the amount of memory that the operating system uses to achieve a 50% balance between Adobe and other applications/OS.
To work around this issue:
In the memory allocation area in the Memory preferences dialog (Preferences > Memory), it shows the amount of RAM available to Adobe and other applications.
Change the value listed for other applications to represent 50% of the total installed RAM.Restart Adobe application to activate new memory allocation.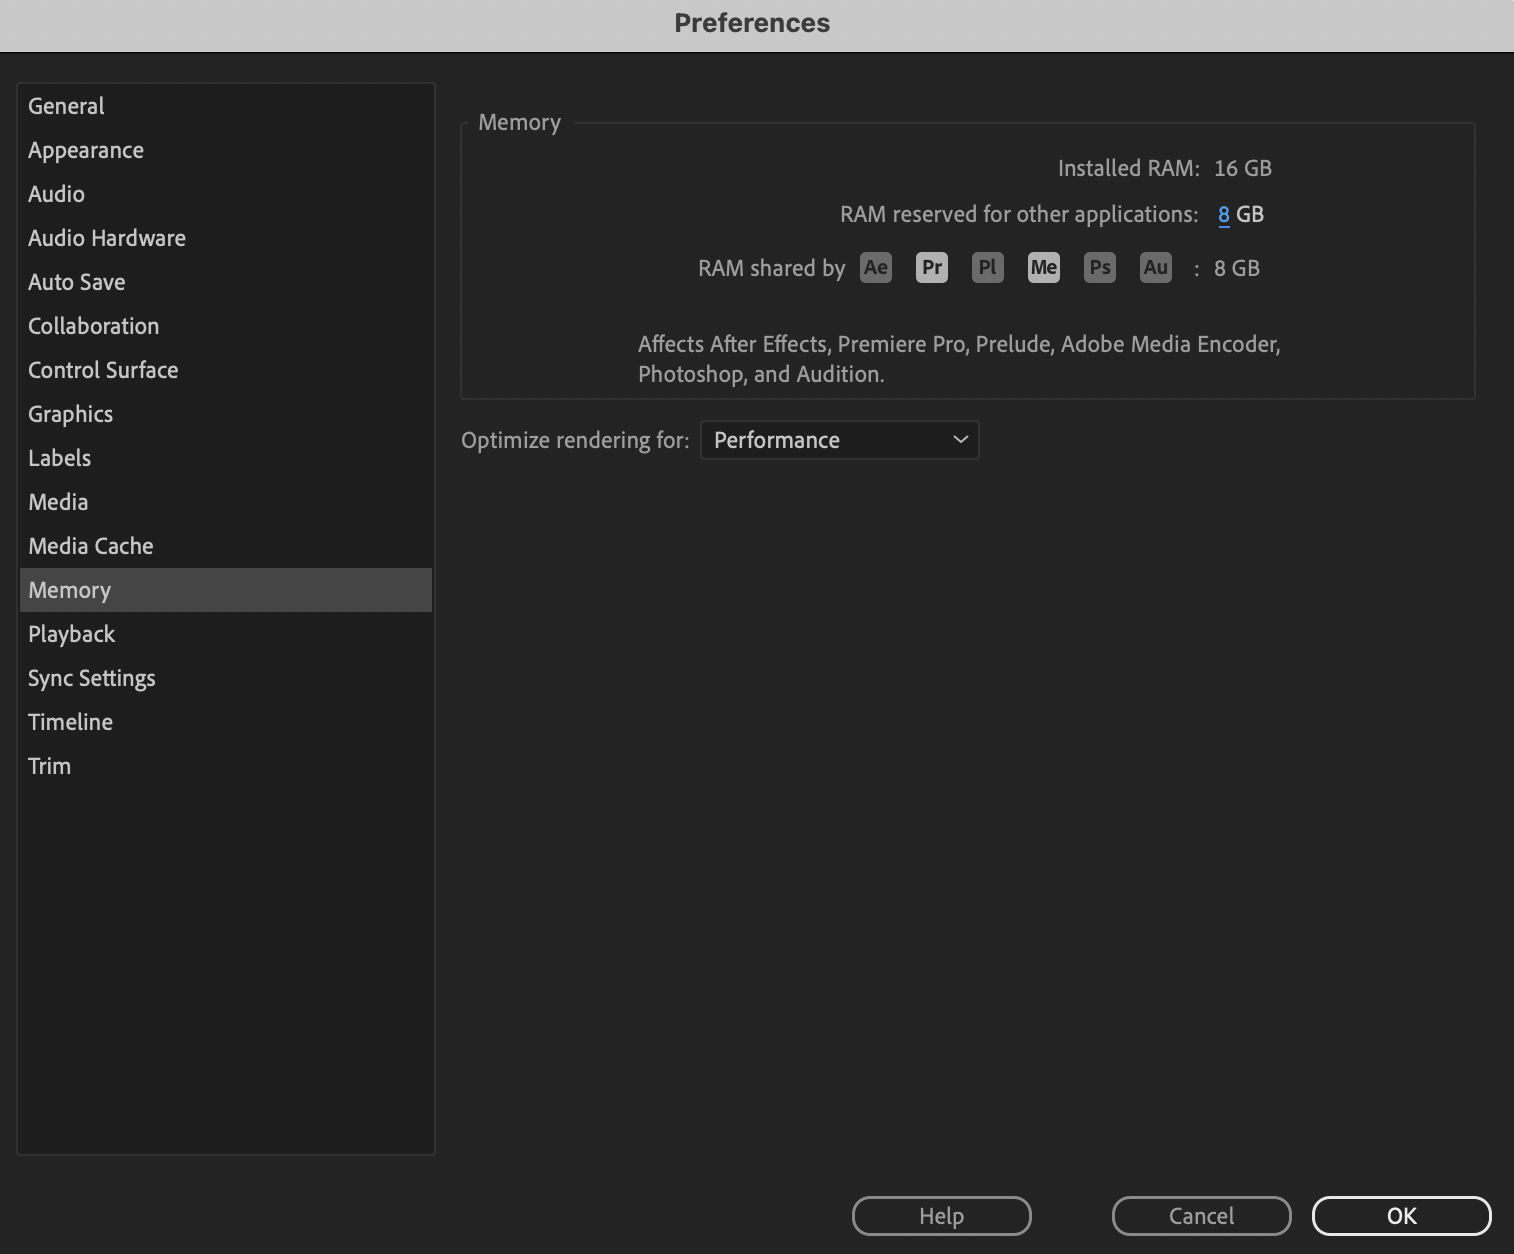
October 2021 Release (Version 22.0)
Lưu ý:
Important After Effects update for Premiere Pro and Adobe Media Encoder users After Effects 22.0.1 includes fixes for issues in Premiere Pro and Adobe Media Encoder. Issue: Premiere Pro 22.0 and Adobe Media Encoder 22.0 could become unresponsive when using After Effects 22.0 compositions via Dynamic Link. Solution: Update to After Effects 22.0.1.
This issue occurs when:
Importing or working with After Effects compositions via Dynamic Link in Premiere ProUsing Motion Graphics templates (MOGRTs) created in After Effects. Premiere Pro may become unresponsive while loading a MOGRT.
A fix for this issue is available now in After Effects 22.0.1.
PREMIERE PRO HANGS ON LAUNCH ON mac
OS SYSTEMS
Follow the steps in this knowledge base article.
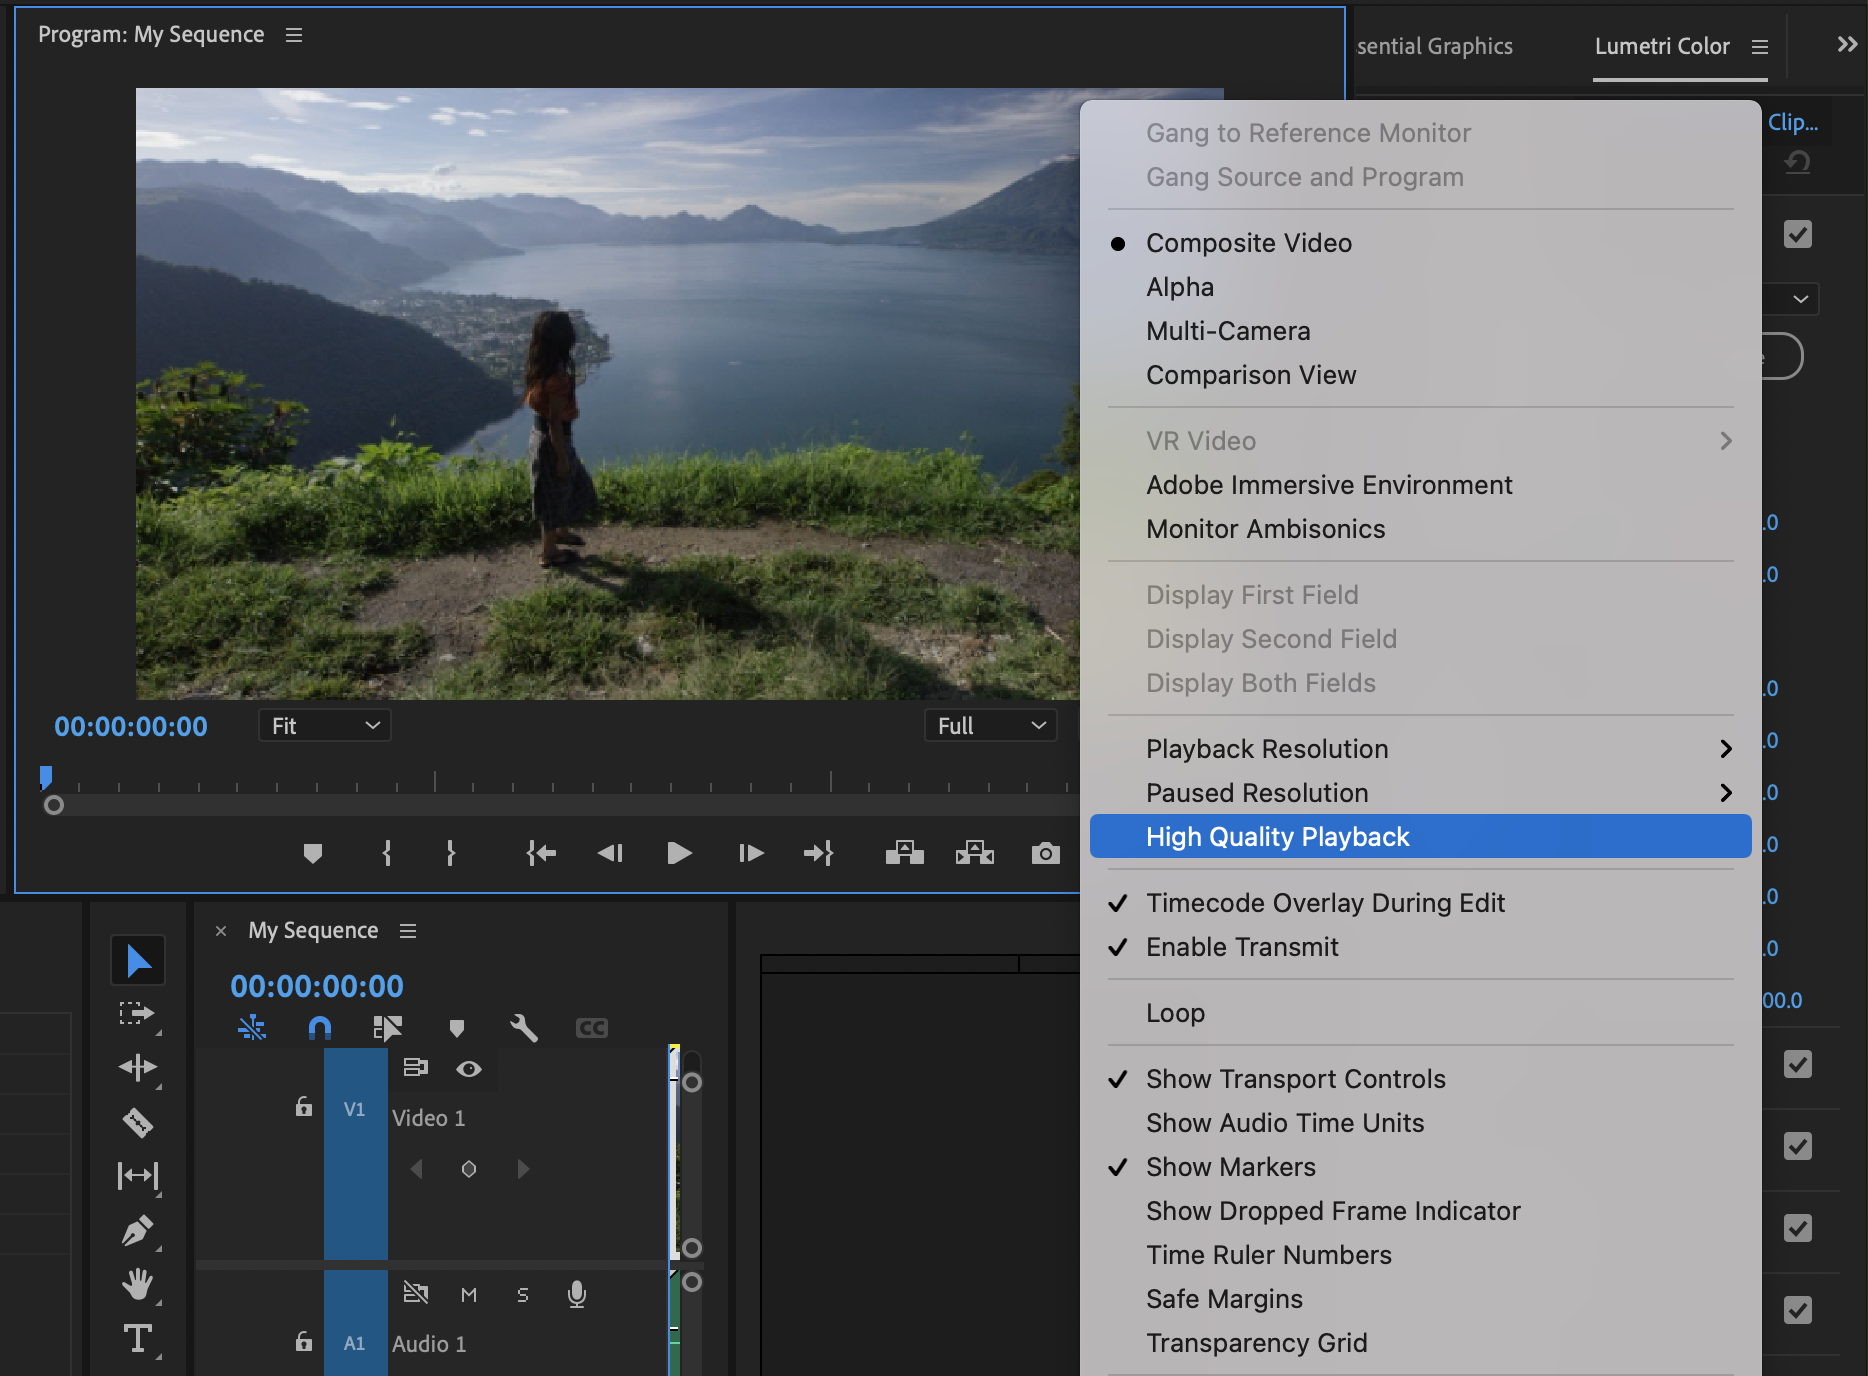
H.264 422 MEDIA WILL DROP FRAMES WITH DEFAULT HALF-RESOLUTION PLAYBACK
This is a capture format used with cameras such as the Sony A7siii, and others. This issue typically occurs when playback resolution is set to half.
To avoid this issue, switch to full resolution OR enable High-Quality Playback using the wrench menu in the Program Monitor. If you need half-resolution playback only, download the latest Beta versions of Premiere Pro and After Effects, which have the fix for this issue.
We will include this fix in the release versions soon. In the interim, consider these workarounds:
Set playback resolution to full and enable high-quality playback from the program monitor wrench menu.
If needed, revert to Premiere Pro 15.4.1.
Use the current public Betas of Premiere Pro and After Effects.
Hang when using After Effects MOGRTs in Premiere Pro.
Premiere Pro 22.0 hangs or freezes when using Motion Graphics Template (MOGRTs) that were created in After Effects. The MOGRT often gets stuck at 15% while loading and cause the application to become unresponsive. A fix for this issue is available now in the Premiere Pro (Beta). We will bring the fix into the release version soon. In the interim, consider these workarounds:
Avoid using MOGRTs created in After Effects.
Revert to Premiere Pro 15.4.1 and After Effects 18.4.1.
Use the current public Betas of Premiere Pro and After Effects.
After Effects MOGRTs that use Lumetri parameters fail to render in Premiere Pro.
MOGRTs created in previous versions of After Effects that use Lumetri will fail to apply the Lumetri adjustments. You can see the Lumetri parameters for the MOGRTs in the Essential Graphics panel, but adjusting them has no effect.
Workarounds:
Recreate the MOGRT in the current release of After Effects and reimport into the current version of Premiere Pro.
Phần mềm dựng phim Adobe premiere là gì? Vai trò của phần mềm Adobe Premiere như thế nào? Hướng dẫn sử dụng Adobe Premiere như thế nào?
Những điều bạn cần biết về phần mềm Adobe premiere là gì? Tất cả sẽ được giải đáp qua bài viết sau đây.Hãy cùng tmec.edu.vn tìm hiểu trong bài viết dưới đây để có cái nhìn đúng đắn cũng như lựa chọn sáng suốt trước khi quyết địnhhọc adobe Premierenhé.
Phần mềm dựng phim Adobe Premiere là gì?
Phần mềm premiere là gì?
Phần mềm Adobe Premiere còn được gọi là premiere hay Pr. Là một phần mềm dựng phim chuyên nghiệp được cung cấp bởi hãng Adobe Systems.
Adobe Premiere là một phần mềm hiệu chỉnh video, người dùng có thể sao chép, hiệu chỉnh và chia sẻ video trên net, trên radio, trên đĩa hoặc trên những thiết bị. Phần mềm Adobe Premiere sử dụng cơ chế mới cho phép nhập, biên tập và xuất video với chất lượng cao HD (high-definition). Tuy nhiên, để làm việc tốt với video chất lượng HD yêu cầu hệ thống máy tính của người dùng phải rất mạnh, lượng RAM lớn và đĩa cứng có tốc độ cao, dung lượng còn trống lớn.
Chức năng của phần mềm
Adobe Premiere
Đây là một trong những phần mềm được các nhà làm phim chuyên nghiệp lựa chọn, và cộng đồng hỗ trợ đông đảo. Là một phần mềm hoạt động đa nền tảng, dễ dàng cài đặt. Premiere có thể tạo ra những video có khả năng tương thích với hầu hết các thiết bị đầu ra, dễ dàng lưu trữ và chỉnh sửa. Premiere là phần mềm nâng cao thường được các trường đào tạo sau khi sinh viên học xong các kiến thức về các phần mềm thiết kế đồ họa.
Premiere cho phép nhập vào nhiều định dạng video khác nhau, chấp nhận nhiều định dạng ảnh, vector, hay ảnh động. Với giao diện thân thiện dễ sử dụng, Pr cho phép chỉnh sửa màu sắc, tạo hiệu ứng phim ảnh, kĩ xảo. Bạn cũng có thể thêm vào vô số các hiệu ứng chuyển cảnh, các plugin từ bên ngoài vào. Bạn có thể thêm tiêu đề, mô tả, âm thanh…

Phần mềm dựng phim Adobe Premiere
Hướng dẫn sử dụng Adobe Premiere
Làm quen với giao diện phần mềm Adobe Premiere
Giao diện chính của
Adobe Premiere chia thành 5 vùng mà ta cần phải nắm rõ chức năng của từng vùng để tránh bị nhầm lẫn cũng như hoa mắt khi lần đầu sử dụng phần mềm này cũng như dễ dàng hiểu sâu hơn về hướng dẫn sử dụng Adobe Premiere trước khi bắt tay vào thao tác các công cụ trênphần mềm

- Khu vực 1:Project Pannel đây là cửa sổ dự án nơi chứa tất cả các file nguồn đã import và title tạo trong quá trình dựng phim
- Khu vực 2:Source Monitor đây là màn hình giúp ngườidùng xem lại các file nguồn
- Khu vực 3:Program Monitor đây là cửa sổ chứa các sản phẩm của chính bản dựng lên. Màn hình này cho phép tất cả các hình ảnh, âm thanh và cả effect thực hiện trong quá trình dựng được phát lại cho người dùng xem thành quả và kiểm tra
- Khu vực 4:Effect Pannel đây là nơi bạn có thể tìm các hiệu ứng, kỹ xảo của chương trình
- Khu vực 5:Timeline Pannel đây là khu vực theo dõi tiến độ làm việc cảusequence gồm đường hình hay còn gọi là
Video tracks và đường âm thanh -Audio tracks
Ngoài cửa sổ giao diện chính này ra cũng cần phải làm quen với một số cửa số làm việc khác sẽ sử dụng đến trong quá trình dựng phim của mình. Đó là
-Effect Controls đây là cửa sổ dùng riêng để điều chỉnh hiệu ứng âm thanh và hình ảnh

-Audio Mix đây là nơi bạn sáng tạo, cắt ghép, điều chỉnh âm thanh.

Như vậy là ta đã làm quen với các cửa sổ làm việc trong
Adobe Premiere. Cùng bắt tay vào các bước dựng phim với phần mềm
Adobe Premiere thôi
Tạo project, sequence mới
Tạo project khi mới mở
Adobe Premiere
Bước 1: Ta bắt đầu khởi động phần mềm
Adobe Premiere. Sau đó sẽ xuất hiện hộp thoại "Welcome to
Adobe Premiere"

Bước 2: Chọn New Project để tạo một dự án mới.
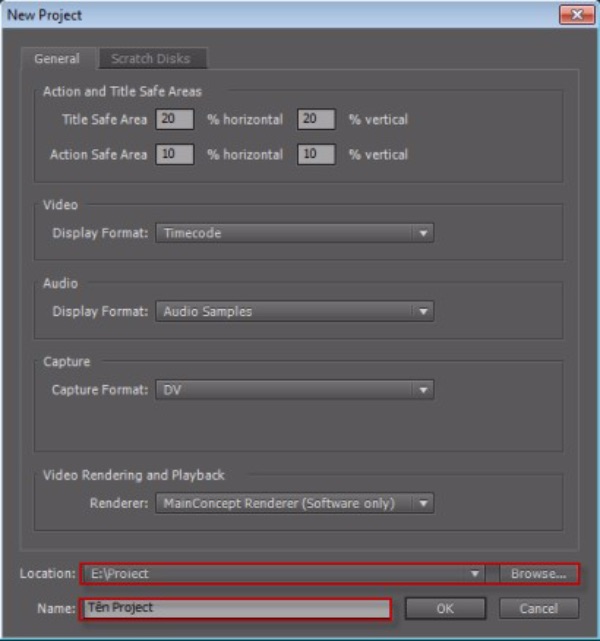
Bước 3: Xuất hiện hộp thoại New Project. Lựa chọn thư mục lưu dự án của bạn trong phầnBrowse. Đặt tên thư mục ở mục Name.
Bước 4: Kết thúc bước tạo Project bằng nút OK
Tạo Project mới khi AP đang mở
Cách 1:
Bước 1: Chọn File => New => Project trên thanh công cụ
Adobe Premiere

Bước 2:Xuất hiện hộp thoại New Project. Lựa chọn thư mục lưu dự án của bạn trong phần
Browse. Đặt tên thư mục ở mục Name.
Bước 3: Kết thúc bước tạo Project bằng nút OK
Cách 2:
Sử dụng phím tắt CTRL +ALT + N (máy win) hoặc COMMND + ALT + N (máy mac)
Tạo sequence mới
Sequence nghĩa là một bản dựng trong một project được tạo. Một project có thể có nhiều sequence khác nhau. Đây là nơi diễn ra các thao tác biên tập, chỉnh sửa phim trên đó. Sau khi tạo xong 1 project mới ta tiếp tục tạo các sequence tiếp theo để tiếp tục thực hiện.
Cách tạo Sequence được thực hiện như sau:
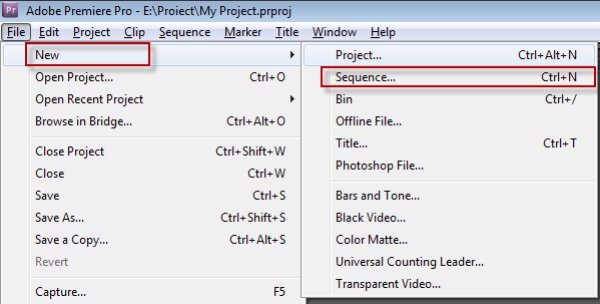
Bước 1: Chọn File => New => Sequence trên thanh công cụ.
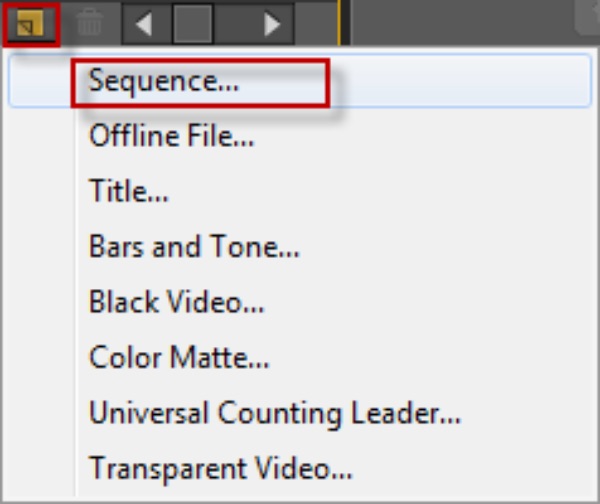
Hoặc tìm trong khu vực cửa sổ làm việc Project(Project Pannel) => New Item =>Sequence
Với trường hợp bạn vừa tạo một project mới thì
Adobe Premiere sẽ bắt buộc bạn phải tạo luôn một sequence mới. Ngay sau các bước tạo project mới thì sẽ xuất hiện hộp thoại New Sequence. Lúc này bạn đặt tên cho sequence rồi bấm OKlà hoàn thành xong

Bước 2: Ở mụcSequence Presets lựa chọn trong danh sáchAvailable Presets 1 sequencen
Bước 3: Đặt tên chosequence rồi bấm OKlà hoàn thành xong
Import và quản lý file import
Import
Sau khi tạo xong project và sequence ta cần phải import các đoạn phim, âm thanh và hình ảnh để bắt đầu dựng phim. Có 4 cách để Import cụ thể:
Cách 1: Kéo file video, hình ảnh, âm thanh thả trực tiếp vàoSource Project
Cách 2: Trên thanh công cụ chọn Menu => File => Import hoặc nhấn tổ hợp phímCtrl + I, sau đó bạn chỉ cần lựa chọn file chưa hình ảnh, âm thanh và video mình muốn dựng bấm OK là xong

Cách 3: Trên cửa sổ Project bấm chuột phải vào vị trí bất kỳ trên cửa sổ sau đó chọn Import và lựa chọn file chứa dữ liệu rồi bấm ok là xong
Cách 4: Kích đúp chuột vào cửa số project và chọn import và tiếp tục các thao tác như 3 cách trên để hoàn thiện.
Quản lý file import
Bạn cần quản lý các file import của mình bằng cách chia nhỏ nhiều thư mục và ghi rõ từng thư mục chứa dữ liệu gì để việc tìm kiếm sau này trở nên dễ dàng hơn. Bạn có thể chia thêm nhiều thư mục con ở các thư mục chính để giúp tôi ưu import nhất có thể.

Cắt ghép Video
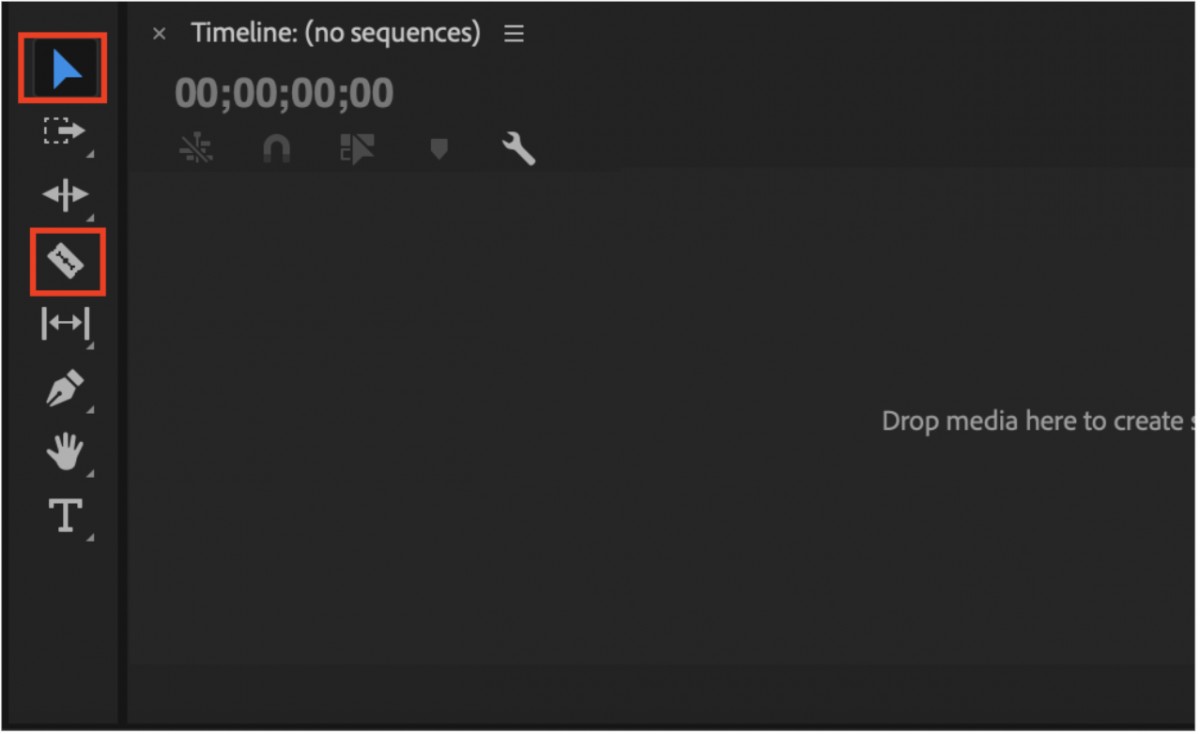
Để thực hiện thao tác cắt ghép Video, bạn cần chú ý đến 2 công cụ chính như sau:
- Move Tool (V): Dùng để kéo dài hoặc rút ngắn Video khi đưa chuột đến đầu phần Video cần cắt.
- Razor Tool (C): Dùng để cắt Video theo ý muốn trên
Timeline.
Tùy vào độ dài của Video, bạn có thể lựa chọn một trong 2 công cụ để thực hiện thao tác với Video trên Timeline là hoàn thành.
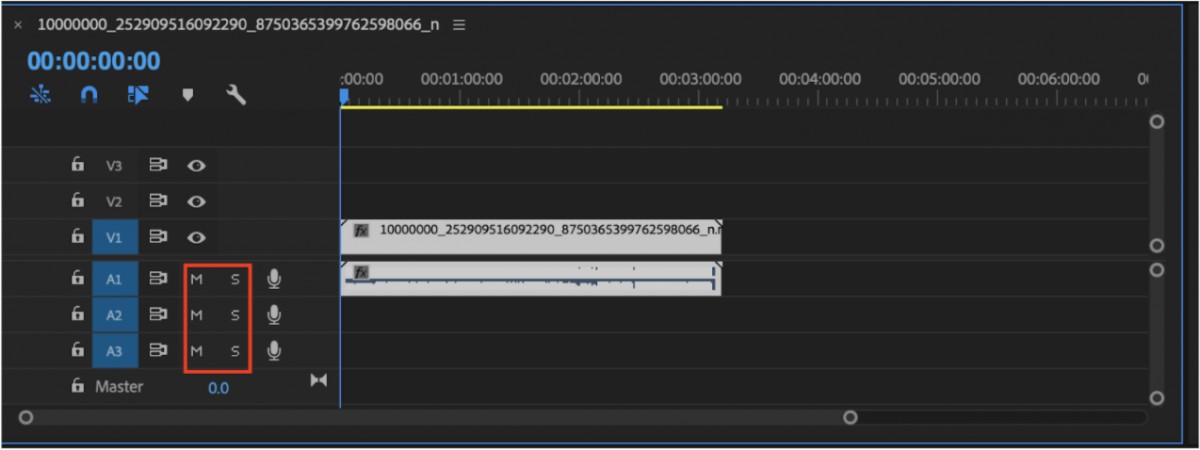
Chỉnh âm thanh
Ngoài hai công cụ Move Tool và Razor Tool để chỉnh âm thanh, bạn có thể sử dụng các thao tác khác như sau
K
- Ấn icon M ở đầu thanh Audio trên Time để tắt tiếng 1 thanh Audio.
- Bấm chọn icon S ở đầu âm thanh trong Timeline để chỉnh cho âm thanh phát tiếng.
Để thêm các hiệu ứng khác trong quá trình tùy chỉnh video, bạn thực hiện như sau:
Bước 1: Chọn Clip có chứa file âm thanh cần chính sửa
Bước 2: Mở Effect => Audio transitions => chọn hiệu ứng phù hợp.
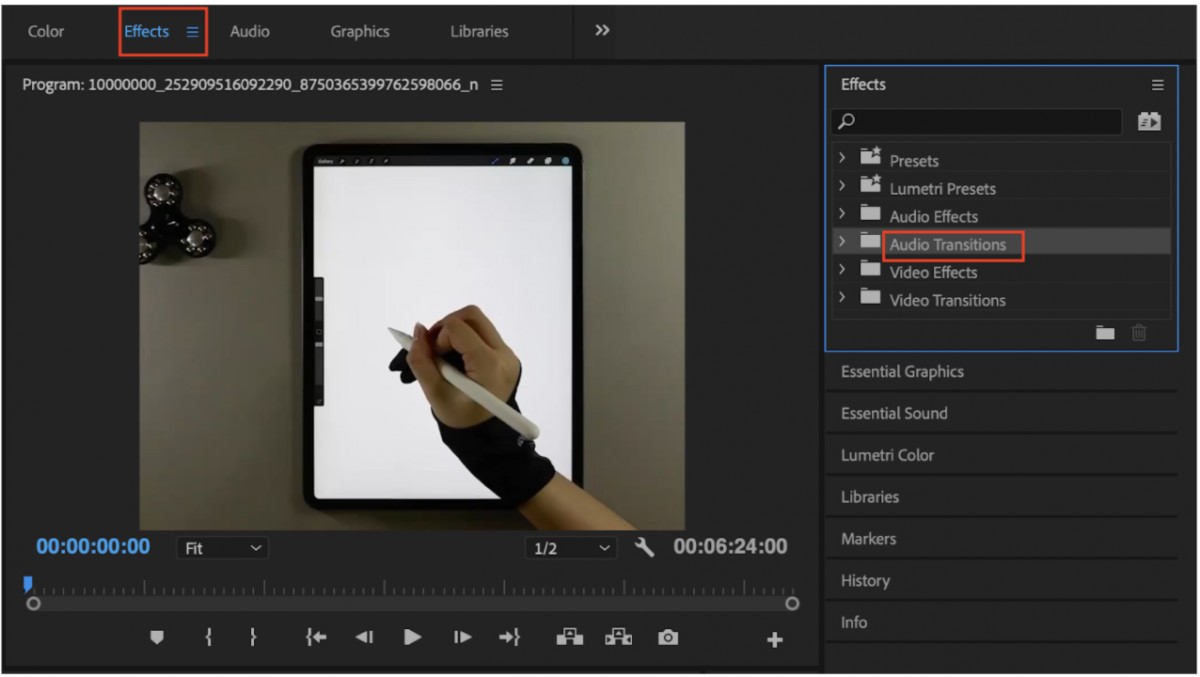
Bước 3: Kéo thả hiệu ứng vào vị trí âm thanh cần chỉnh.
Bước 4: Điều chỉnh độ ngắn dài của Transitions trên Effect Controls.
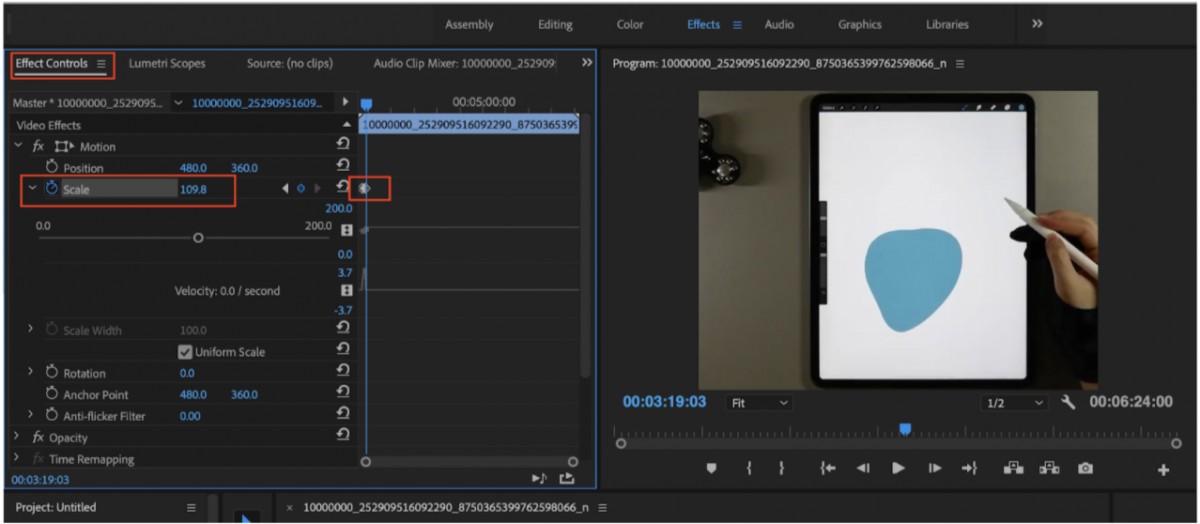
Tạo chuyển động
Để tạo chuyển động trong Premiere, bạn cần phải làm việc với Keyframe. Đây là vị trí trên một đường không gian đánh dấu sự bắt đầu hoặc kết thúc của quá trình chuyển đổi, tạo hiệu ứng di chuyển của một đối tượng đi từ điểm A đến B trong dòng thời gian.
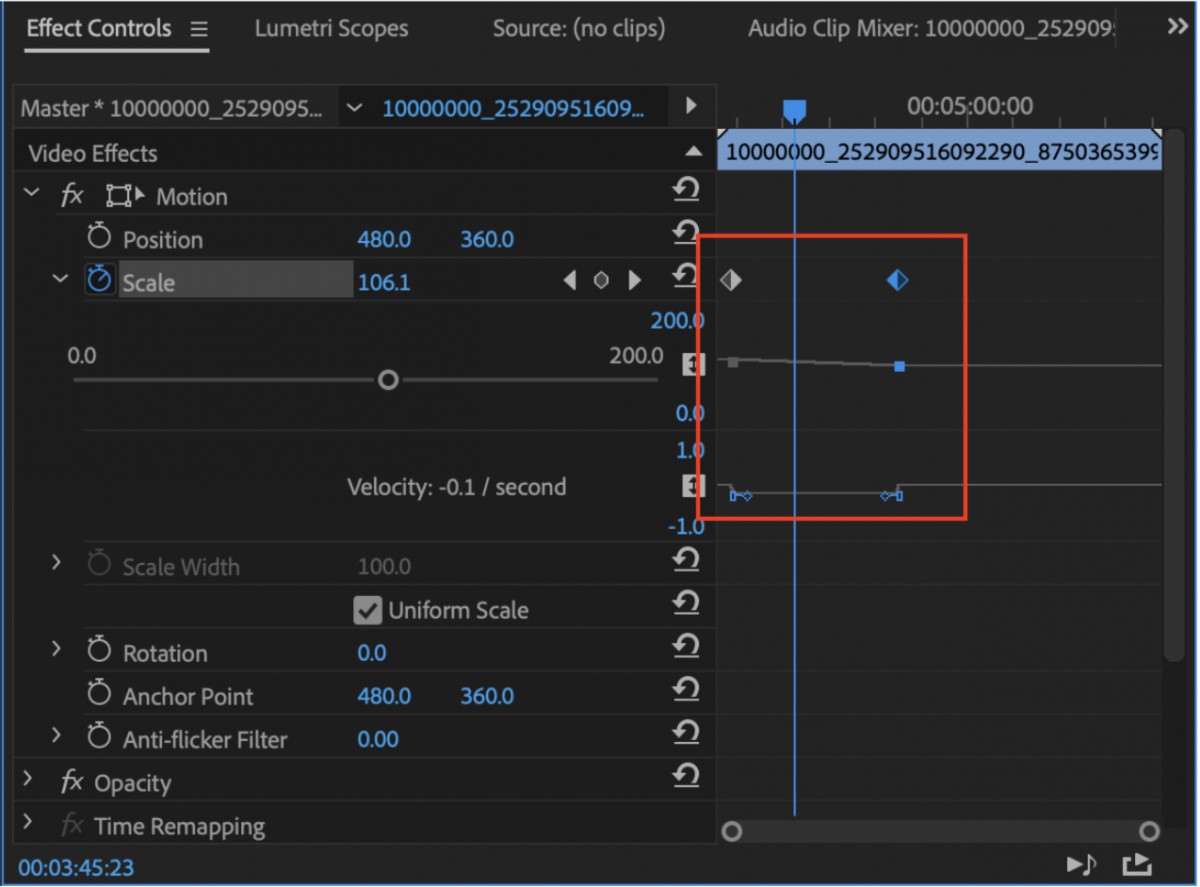
Cách thực hiện như sau:
Bước 1: Chọn điểm bắt đầu. Công cụ điều khiển thời gian sẽ ở điểm đầu của đoạn Clip đó.
Bước 2: Click vào đoạn Clip => vào mục Effect Control => chọn hiệu ứng Effect để sử dụng.
Bước 3: Click bào biểu tượng có hình đồng hồ bên cạnh hiệu ứng vừa chọn trong Effect Control.
Bước 4: Chọn điểm kết thúc.
Những điều bạn cần biết về phần mềm dựng phim Adobe Premiere?
Bạn cần hiểu rằng Adobe Premiere là 1 phần mềm chỉnh sửa video chuyên nghiệp, thật không dễ dàng gì để chinh phục được nó. Thế nhưng nếu bạn chỉ cần nhu cầu đơn giản, thìcách dùng adobe premiere đơn giảnvẫn có thể giúp bạn làm điều này mà không gặp bất kì khó khăn nào.
– Adobe Premiere là phần mềm làm phim năng xuất. Nhưng nếu bạn muốn làm việc lâu dài với nó bạn cần trang bị 1 máy tính có cấu hình đủ mạnh, và chuyên dụng.
– Adobe Premiere là phần mềm chuyên cắt ghép và hiệu chỉnh video. Chúng cho phép bạn chỉnh sửa âm thanh và hiệu ứng. Thế nhưng để có thể tạo ra những hiệu ứng âm thanh hay hình ảnh phức tạp thì bạn cần sử dụng các phần mềm hỗ trợ. Premiere tương thích và hỗ trợ tốt với nhiều phần mềm khác. Trong đó có audition (phần mềm chỉnh sửa âm thanh chuyên nghiệp), Aftereffec (phần mềm chỉnh tạo hiệu ứng hình ảnh, và diễn hoạt).
– Bạn cũng cần hiểu rằng Adobe Premiere là phần mềm dựng phim chứ không phải là thiết kế đồ họa. Nếu như liệt kê thì Premiere là phần mềm được tạo ra phục vụ cho mảng truyền thông đa phương tiện.
Xem thêm: Combo lên thắng đĩa trước cho wave a độ đẹp lên phanh đĩa bền và rẻ
Tổng kết
Hy vọng rằng với những chia sẻ vừa rồi của tmec.edu.vn về hướng dẫn sử dụng premiere chi tiết từ cơ bản kèm theo đó là các thông tin hữu ích giúp bạnhiểu rõ hơn về phần mềm dựng phim Adobe Premiere chuyên nghiệp này. Đối với những bạn yêu thích ngành kỹ xảo. dựng phim thì không nên bỏ qua khóa học After Effect trên tmec.edu.vn được. Khóa học được thiết kế bài bản theo đúng lộ trình từ cơ bản đến nâng cao giúp bạn cập nhật kiến thức nhanh chóng.
Chúc các bạn thành công!
tmec.edu.vn gợi ý cho bạn: Khóa học "Dựng phim truyền thông đỉnh cao với Adobe premiere"